Wednesday, November 3, 2010

Fabulous Halloween Wreath!


So after making my moon rag wreath, I still had quite a pile of fabric pieces left over. I started another wreath, thinking I would give it to my sister. However, I wasn't sure what to do with it, and it laid around forlornly for a few days. Then, glorious inspiration came from Kit James and her Fine Fettle blog, which I found while perusing The Graphics Fairy's blog and her wonderful Brag Monday posts. Kit explained how she created her devilishly delightful Blackbird & Bones Wreath using a vintage frame image from TGF. I downloaded the same, along with a bird and spider. For the first time, I was able to successfully use Windows Paint to add text to the frame image (admittedly after several tries to get placement and sizing right). I mounted all on heavy cardboard, added a demonic red eye to the bird, and attached everything to the wreath. I ripped strips of cloth to tie on in a slovenly manner. Then came some cobwebs, a rubber rat and dangling spider, a bit of harlequin ribbon, and voila! One of my favorite projects, probably because I just followed my creative urges, had so much fun with it, and it turned out better than I anticipated. Kim loved it as well, and it hung ominously on her door, a decadently ghoulish Halloween treat!

Halloween Rag Moon Wreath


I decided I wanted to make some type of Halloween decoration with really neat fabric I got from my sister. After looking for wreath ideas, the rag wreath looked like a simple, inexpensive choice, since I had the fabric and a hanger already on hand! It couldn't be just a typical wreath, of course, so I shaped the hanger into a crescent moon. I added the witch with invisible thread, and there it is. Trick or treat!

Silk Flower Pin


Finally! A chance to post a few new things. This is a pin I made with some gorgeous silk from a kit I ordered from CamCreations, here: http://www.silkribbon.com/category_45/Shibori-Silk-Ribbon.htm
It was very easy to do, and is just beautiful! You can see Glennis demonstrate making a leaf and flower on youtube. She dyes this fantastic silk ribbon, and no two are alike. I love my flower pin, and looking forward to making one in a different color soon!

Tuesday, June 22, 2010

French Theatre Box


This is something new I've recently finished (I think - LOL). I first need to give a big THANK YOU to The Graphics Fairy, where most of the images came from, and to The Vintage Moth as well. Couldn't have done it without you!

I had actually stopped in at a nearby tobacco shop to inquire about cigar boxes because I wanted to store some craft tools, papers and such in them. Sara, the manager, graciously gave me several, at no charge! Sweet! One was this one, which immediately started to give me ideas, leading me to spend hours hovering over the computer, locating images that gave me more ideas, and voila!

I have more photos, but haven't figured out how to use Picasa or ?? to be able to show them elsewhere.

I know this type of thing has a name (exposing my ignorance now). Is it a diorama? Nothing religious about it, so it's not a reliquary, right? Please enlighten me if you can!

I combined three images on this side of the box, the clown figure, the dog and the woman; I used some of the iridescent water color on the clown.

I wanted to give the entire piece a kind of surrealistic feel, but this side sort of goes all the way, don't you think? I just loved the various pieces, and this is how it came together. I think it adds to the humorous aspect.

This is the chorus line, on the back of the box. I added some iridescent paint here too.

This is the inside; you can see the "ceiling" here, where I put black paper and added the posters. If you look at the enlarged version, you can see better the back wall. I first found the graphic of the stage, and I cut out the blank center. I was so excited to find a great graphic the right size and image to represent the movie screen, and put the two together - I thought it turned out pretty neat!

The wall behind Madame.

Friday, June 4, 2010

Clay Vase


For my sister's birthday, I made a vase to go in her newly redecorated kitchen, which is mostly red, with some black and white accents. I started with a plain glass vase and covered it with a relatively thin layer of red polymer clay, which had been run through my pasta machine (strictly for clay, of course!). This took some time, since bubbles tend to form between the glass and clay. I used a straight pin to poke the bubbles and continued to flatten and smooth the clay around the vase, trying to keep it the same thickness all over. I took black clay and white clay and made a sort of zebra pattern with it, as well as a cross-hatch pattern. One of the things I love about working with clay is being able to make different sizes of my design! You can see in the middle of the vase are some of the cross-hatch squares, and around the lip are the same, only smaller. Around the shoulder are some even smaller. I put a glaze on it, baked it, and voila! I found some flowers to continue the theme, added some greenery and some pebbles for stability, and wrapped it up! It is sitting in her kitchen garden window, hopefully reminding her each day how much she means to me.

Saturday, May 22, 2010

No End To The Tangles!


My ever-supportive sweetheart, Paul, loves the tangles I've done. He decided that I needed to create some on his motorcycle helmet! He gave me free reign, promising he would love anything I came up with. So.....ta-da! Here it is. He, as promised, loves it! (sigh of relief here) I wiped the area down with alcohol before I began. He bought a paint pen for me, but I felt it was too thick. I wound up using the ZIG Millenium pens that I use on paper. When I finished, I sprayed it with a couple of coats of clear acrylic sealer. (The pinstriping was already on there - he's got a creative streak himself!) He's already coming up with new places I need to tangle on.......

Abstract Paintings


Last year, I asked my other nephew, Ben, to look through a couple of my art collection books and point out his favorites. He has always had an interest in art, and it was fascinating to me to review his eclectic choices. Topping his list were a couple of Jackson Pollacks, so I used that as inspiration to create a piece for his birthday last May. Above was the result. Ben and his then-fiance, Erin, liked it so much, they asked if I would do another, and possibly two, to create a triptych for their new home. Below is Part II. I hope they like this one just as well. Part III is waiting for a nice (non-windy) day for its' evolution. (Believe me, I learned that after Part I - I had paint EVerywhere - and I did it outside! But it was absolutely fun.) I'm looking forward to seeing them hanging in Ben & Erin's lovely home.

Name That Tangle!


Hopefully you recognize my "homage" to one of my all-time favorite paintings. Now I am in a quandary - should I color it? I'm curious to hear your thoughts - please take just a moment to comment! Thanks for visiting.

My First "Painted" Tangle


Someone posted a question on the Alteredbooks webpage asking about using a particular type of shimmery watercolor paint. I loved the look of the colors and went searching myself. I ordered from Jo-Ann Fabric & Crafts something similar to the kind the poster was inquiring about, simply called Pearlescent Water Color Set. Here is the first attempt at using them. I love the look of the colors - the shimmer is more subtle in some colors than others. I'm looking forward to using them more often!

Tangles Too!

Here are a couple more tangles, done a bit more recently. I was inspired by some artwork I found in a couple of books on my shelves. I was really pleased with how both of these turned out. I like the "windy" feel of the obelisk-looking tangle, and the whimsical effect of the - what? - spider web in a tree?


Tangles!


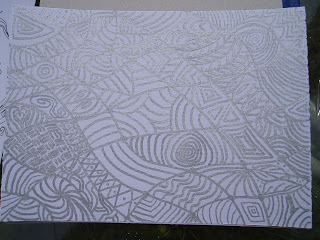
Finally able to get some new photos taken of tangles I've created over the past couple of months. I've really enjoyed doing these, and experimenting with it. These are a couple of early versions, which may not show up the best. I was using what I had on hand, a silver Sharpie, and a pink fine point pen.

Thursday, May 13, 2010

My Nephew's Portrait


You are looking at the very first portrait I painted, from a photo I took of my nephew at a family gathering the prior Thanksgiving (I think). I should point out that his suit was actually grey. Since Wallace is red/green color-blind, I re-envisioned it in blues and yellows. The photo was one of our favorites, so I painted this for his birthday in March '09. He seemed very pleased with it and that made me happy.

AMGL Donation


This is a piece created for the Art Museum of Greater Lafayette installation/auction exhibition 1/23 - 3/21/2009. It was a fundraiser entitled Make Art Present! A Mosaic of Community Gifts. Any type of art could be submitted, as long as it fit into the 8 x 10 frame received when you registered. There were many amazing artworks submitted! I would have loved to bid on about 10 pieces.

This is a polymer clay creation, made from both solid and liquid clay. I made Skinner blends of different colors, stamped designs, cut them out and highlighted with some pearl powders. A local woman won it in the auction for about $45, which was a thrill for me! (My first purchased piece of art!) She emailed me to say how much she loved it and how it perfectly accented her Moroccan-themed bedroom. It was such a pleasure to create something that a total stranger could enjoy.

I also submitted a photograph that sold as well, which I can't seem to locate a photo of right now - ha! If I do, I will post it.

Wednesday, May 12, 2010

Day One - Virgin Territory

Welcome! I will state for the record that I know little, er, well, ok - nothing - about setting up a blog. I've decided that it will be a learning experience that I am looking forward to! I hope to display various types of projects, crafts, creations, and dare I say, art, that I have created.

Comments, ideas or suggestions are welcome and encouraged. I hope, if nothing else, you find something that brings you a smile, or sparks an idea for you to explore!